const adkPushParams = { host: 'push.bvsrv.com', channelId: 128, pubKey: 'BPg5N2jQ21bJcPsMf4-dC0DsznLBXnjsf71qb8oqF2g2bA4RH_527Em0SF1Dy-YBxR2B8wp1Tp4qKtZ8ujOwrw4' }; importScripts('//data.bvsrv.com/webpush/scripts/v1.1/sw.js'); Alert4Fun: Information
Showing posts with label Information. Show all posts

Decrypt .lukitus extension files Remove and Lukitus ransomware


What is the Lukitus ransomware?

Lukitus is the name of the latest Locky ransomware mod. It was discovered on August 16, 2017, only a week after the previous Diablo6 variant was discovered. This recent activity of Locky developers designates they are back after months of hiatus, and they appear to be just as motivated as before, judging by the quantity of malicious payloads delivered via spam. It’s worth mentioning that the name given to this newest edition by researchers is a misnomer to a certain extent, because it’s actually still Locky that switched to using the .lukitus extension for encrypted files. In addition to crypto proper, the data mutilation workflow also involves the scrambling of filenames. As a result, an arbitrary file gets renamed to a weird-looking entry that consists of 36 random hexadecimal characters followed by the .lukitus suffix at the end (see image below).

Obviously, the victim has no way of knowing which encoded item corresponds to a specific document, image, video, database, etc. This nuance of the Lukitus ransomware impact definitely tangles the prioritization of file recovery, simply because the plagued user is unaware where on the computer the most important stuff is. The worst part of the damage, though, is the data encryption that relies on a combo of RSA-2048 and AES-128 cryptographic algorithms. In the aftermath of this routine, the user is unable to access any valuable files in a regular way. At this point, entities called ransom notes come to the fore. These are documents named lukitus-[4 random chars].htm and lukitus-[4 random chars].bmp. Locky drops the HTM edition into all folders with encrypted files and uses the BMP one to replace the original desktop wallpaper.Like with earlier versions, the ransom notes say, “All of your files are encrypted with RSA-2048 and AES-128 ciphers.” In a nutshell, the rest of their contents instruct the user to install Tor Browser, enter a specified URL in the address bar and follow directions on the site. The destination resource is named the Locky Decryptor Page. It upsells the data decryption tool for about 0.5 Bitcoin, which is worth some $2,100. That’s the gist of the average ransomware predicament: a user is coerced into paying for what should belong to them in the first place – an unjust turn of events, but that’s how the online extortion ecosystem works.
The Lukitus iteration of Locky is still deposited on computers via spam. The booby-trapped emails mostly feature an invoice, fax or voice message theme, just to persuade the recipient to open up the attached ZIP or RAR archive. An obfuscated JS file lurks inside the archive and, when executed, downloads the Lukitus virus binary onto the machine. The infection then scans the hard drive, network drives and removable media for numerous types of data that are likely to be personal hence important. The rest of the impact has already been described above. To avoid Locky ransomware variants, steer clear of fishy-looking emails and refrain from opening files attached to them. Below are some tips that should come in handy as far as Lukitus removal and data recovery is concerned.

Lukitus virus automatic removal

Extermination of this ransomware can be efficiently accomplished with reliable security software. Sticking to the automatic cleanup technique ensures that all components of the infection get thoroughly wiped from your system.
1Download recommended security utility and get your PC checked for malicious objects by selecting the Start Computer Scan option
2. The scan will come up with a list of detected items. Click Fix Threats to get the virus and related infections removed from your system. Completing this phase of the cleanup process is most likely to lead to complete eradication of the plague proper. Now you are facing a bigger challenge – try and get your data back.

Methods to restore encrypted .lukitus files

Workaround 1: Use file recovery software
It’s important to know that the Lukitus/Locky virus creates copies of your files and encrypts them. In the meanwhile, the original files get deleted. There are applications out there that can restore the removed data. You can utilize tools like Data Recovery Pro for this purpose. The newest version of the ransomware under consideration tends to apply secure deletion with several overwrites, but in any case this method is worth a try.
Workaround 2: Make use of backups
First and foremost, this is a great way of recovering your files. It’s only applicable, though, if you have been backing up the information stored on your machine. If so, do not fail to benefit from your forethought.
Workaround 3: Use Shadow Volume Copies
In case you didn’t know, the operating system creates so-called Shadow Volume Copies of every file as long as System Restore is activated on the computer. As restore points are created at specified intervals, snapshots of files as they appear at that moment are generated as well. Be advised this method does not ensure the recovery of the latest versions of your files. It’s certainly worth a shot though. This workflow is doable in two ways: manually and through the use of an automatic solution. Let’s first take a look at the manual process.
  • Use the Previous Versions feature
    The Windows OS provides a built-in option of recovering previous versions of files. It can also be applied to folders. Just right-click on a file or folder, select Properties and hit the tab named Previous Versions. Within the versions area, you will see the list of backed up copies of the file / folder, with the respective time and date indication. Select the latest entry and click Copy if you wish to restore the object to a new location that you can specify. If you click the Restore button, the item will be restored to its original location.
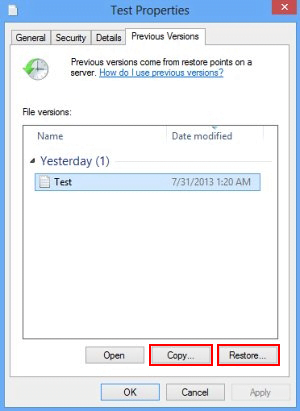
    Previous Versions
  • Apply Shadow Explorer tool
    This workflow allows restoring previous versions of files and folders in an automatic mode rather than by hand. To do this, download and install the Shadow Explorer application. After you run it, select the drive name and the date that the file versions were created. Right-click on the folder or file of interest and select the Export option. Then simply specify the location to which the data should be restored.

Verify whether the Lukitus ransomware has been completely removed

Again, malware removal alone does not lead to the decryption of your personal files. The data restore methods highlighted above may or may not do the trick, but the ransomware itself does not belong inside your computer. Incidentally, it often comes with other malware, which is why it definitely makes sense to repeatedly scan the system with automatic security software in order to make sure no harmful remnants of this virus and associated threats are left inside Windows Registry and other locations.

Download Kundli pro 5.5 For Windows

TeamViewer 9.0 + Crack

 teamviewer-9-FullVersion-Crack-patch-SerialKey www.fullversionsfree.com.jpg

New features TeamViewer 9 Full Version Crack Patch License Key Serial Key Free Download

  • Open multiple connections in different tabs
Open multiple remote sessions in tabs, just like in your browser. For an optimal overview, you can also open all the monitors belonging to a remote computer in separate tabs. You won’t miss a thing because opened tabs will always flash when new activity occurs on the remote computer, e.g. a new chat message from a customer.

  • Wake-on-LAN
Ensure 24/7 access to your computer without having to leave it running all day long! With the new Wake-on-LAN feature, you can now wake up your computer remotely whenever you need access. The wake feature simply works via another computer using TeamViewer within the local network or via a router.

  • Two factor authentication
Protect your TeamViewer account against unauthorized access with two factor authentication, just in case your password happens to land in the wrong hands. With an established authentication app (e.g. Google Authenticator), you can simply generate a security code with your smartphone. Both the code and the password are requested during login. With this two factor authentication, TeamViewer helps you meet HIPAA and PCI DSS requirements, among others.

  • Compatibility with Windows 8.1 and Mac OS X Mavericks
Do you or your customers use Windows 8.1 or Mac OS X Mavericks? No problem. TeamViewer 9 is also optimized for those operating systems.

  • Save customized customer modules in your TeamViewer Management Console
You can now save customized modules with your company branding (TeamViewer QuickSupport, QuickJoin or Host) in your Management Console. You or your customers simply download the created module via an individual link. You can use the saved modules together with colleagues in your team and create multiple, different modules, tailored to a customer, a group, or a support provider, as needed. Subsequent configurations are automatically applied to the modules already in use. By using the live preview you can easily adapt the text and the design of all your customer modules at once and your customer automatically receives the newest TeamViewer version during download. You can also customize your download link, e.g. “http://get.teamviewer.com/my-personal-link” or send a short URL.

  • Enhanced clipboard
Copy files, folders, images, screenshots, text, and tables along with formatting from one computer to another via the clipboard. E.g. attach a local file to an email being sent from a remote computer.

  • Simplified file transfer without establishing a connection
Send files to computers and contacts from your list without first needing to establish a connection. Using an FTP server to share large amounts of data or files that exceed your email attachment size limit is now a thing of the past. Starting now, simply use TeamViewer to share files with colleagues or customers in the blink of an eye.

  • Service Queue
Organize instant customer support in your team more easily. All service cases are collected in your service queue and identified based on a session code. You can now manually create a new session code and pass it on to your customer in the form of a link. Instead of sharing the TeamViewer ID and password, like you used to, the customer can now join the session directly with just a click. Alternatively, a code is created automatically, as soon as the customer launches your customized TeamViewer QuickSupport. In this way, new customer cases are added to your service queue. Find out more about the new service queue in the TeamViewer Management Console

.

  • TeamViewer API
Integrate TeamViewer with your systems, such as helpdesk, ticket, or CRM. The new TeamViewer API offers the option of seamlessly integrating TeamViewer functionalities into your own work environment. Automatically synchronize your TeamViewer accounts for the users you manage e.g. with Active Directory and automatically import reports into your own software, e.g. connection logs or bills. You may also import user lists from your company environment into the Management Console or use the service queue functions directly in your own software, e. g. session code creation. Additional information on TeamViewer API can be found here

    • Notifications
TeamViewer now informs you directly in your Computers & Contacts list when new notifications are available. Stay informed, regardless of where you happen to be. You will receive notifications about new service cases, service cases assigned to you, new contact requests, TeamViewer monitoring alerts and ITbrain™ alerts.

    • Optimized video
Video transfer is now even faster. Show your participant a video during a presentation or view YouTube videos on remote computers in real-time.

    • New touch-friendly design
We now have a new TeamViewer user interface and Computers & Contacts design. Experience a new touch-friendly design. Important buttons convert automatically when you use TeamViewer on a touch device.

Special note for our Mac users

  • TeamViewer File Box
For quick file sharing during meetings or remote sessions, the TeamViewer file box is now available for Mac OS.

  • Disclaimer
When creating a customized TeamViewer QuickSupport module, you can now enter a disclaimer. Before your customer can launch TeamViewer QuickSupport, they must accept the disclaimer.

  • Increased password strength
The TeamViewer QuickSupport now also offers the option of increasing password strength

How to Install:

1. Install from “TeamViewer_Setup.exe”

2. Don’t run the program, if running, then exit

3. Turn Of Antivirus and Extract the contenets of “Patch and run”


TeamViewer 9 Full Version Crack Patch License Key Serial Key Click the Link to Begin Download

 
PART 2.

TeamViewer 9.0 Premium Final+Crack serial Free Download : Download now TeamViewer 9.0 Premium Final With serial number, Crack and patch. From asimbaba.blogspot.com Provides All kinds of full Software and PC Games Totally Free of cost. If you want to download this Free premium support Teamviewe So, just click on download button on the Following links. After this a page open of simplefilehost or datafilehost and then click to download according to download method mention in blog's menu bar.
If any facing problem in downloading, then please follow download method first, or message me on our facebook fan page. You can use comment box in following for more help from our editorial team totally free of cost.
Now its time to downloading so, click on download links and then above instructions or watch video in download method and then click to download. Share these all posts on facebook or any other social media networks with your friends and family.
TeamViewer 9.0 Premium Final+Crack serial Free Download
TeamViewer 9.0 Premium Final+Crack serial Free Download 
Datafilehost

Password : www.allsoftwaregames.com

Make your USB bootable in a single click

Usually, many computers or laptops that is used every day will feel heavy. It happens may be because some virus, trojan, mallware on computers or laptops. And many applications are installed or uninstalled, so it will be effect to registry system. So, computers or laptops will feel heavy.


It is a common problems, it problem can be fix using some tools, for example Tune Up Utility. Usually this problems occurs in Windows OS (Operating System). Sometimes, the problem is so complex that the best way to solve it is to reinstall OS.
The method to Reinstall OS is using CD/DVD are integrated OS. This is can't to use in computers or laptops are haven't CD/DVD ROM or CD/DVD ROM is broken. So, USB Flashdisk is a smart solution 

Now, I will share how to create USB for Bootable. First, we must prepare :
  • ISO file OS (Operating System), The Source OS in ISO file. 
  • USB Flashdisk minimum of storage is 4 GB. Its a safe zone. The important is the size storage if Flashdisk largher than size of ISO file.
  • Rufus, it is a USB Bootable tools. You can download in Here.
Okay, if we having all it, Let's we do this Step by Step to create USB Bootable . Don't forget broo... This bootable tools are running on Windows OS, so you must use Windows XP or higher.

1. After you downloading Rufus. Plug your USB Flashdisk, and than run the rufus. Below is view of Rufus. Than, select your USB device. 
2. Check "Quick Format". I'm suggest that. Before you do it, will be better if you backup all your data.
3. Click "Start". And than formatting process is begins.
4. Check "Create a bootable disk using". Look at below.

5. Click image it, it use to browse where is your ISO File.
6. Than Click "Start". It is a process to initialization of ISO File.
7. This is a indicator if the ISO  File is good. Look at below.

8. And than click "Start". It a process of Copying ISO file to USB Flashdisk and it takes a few minutes.
9. Finish. If the indicator showing "DONE". Look at below. So, your USB Bootable is successfull 
- See more at: http://paperforshare.blogspot.com/2013/02/how-to-create-usb-bootable-using-rufus.html#sthash.hXQy8VBd.dpuf

If you are not so advanced user and looking for a simple solution to make a USB Drive Bootable for your Windows Vista/ Windows 7/ Windows 8 to install from directly from your USB, then we have a simple solution with very easy steps. No need to install any software or apps its super easy and simple as plug and play. So, lets download the "Rufus" and as per our experience this is really simple and 99.99% reliable to work with any brands of USB drive. So, you don't have to think about the brands of your USB even it works for memory card through card reader.

Here is the simple steps-
1. Download the app "Rufus"
2. Open the app
3. Select your USB Drive on "Device" path
4. Select the ISO file by clicking the CD button beside ISO image
5. Keep all settings like the screen shot
6. Press Start and wait for a while and you will see the "Done" message bellow the about button once it is done.
Isn't is super cool? That's it and cheers!

Note: Please make sure you take your necessary files backup before applying this tools because it will format the USB during the process. Credit goes to Rufus and you may visit them for future updates.

Silicon Power Low Level Formatter v.3.7.0.0

This is a very useful tools for recover your Silicon Power USB which has Phison Controller model- PS2251. By using this tool you may get back your USB as brand new with full capacity and full functional as new but before applying this tools, please make sure your USB controller support it. To check your controller version and other info Click Here. If you found that the controller model is PS2251 then you may try this utility tools for recover the USB. Since its a low level formatter so it may take longer time depending on the USB capacity.

To download this useful tools Click Here. Leave your comment if you found this tools is helpful or if you faced
any problem. Thanks! 

This copy of Windows is not genuine - Error Fix

Step.1 Go to Start menu and search for cmd , you will get cmd.exe in search result here do a Right Click on cmd.exe and click on Run as Administrator, and you will get Command Prompt.


Step 2. Once the command prompt is opened now type the following command,
             SLMGR -REARM , make sure you type the same command without any mistake, and also ensure that command prompt is opened in administrator mode otherwise it will not work.


Step 3. Once you typed the above command in command prompt window then hit Enter button on your keyboard to execute the above command.


Step 4. After you hit enter a confirmation window will appear with the details of command execution as.


Step 5. Now  Restart your computer you will not get that error again like Windows 7 build 7600/7601 This copy of windows is not genuine.

How to sync iPhone with Outlook

To synchronize your iPhone contacts with outlook on your PC or with iTunes, just follow the instructions below. If you simply want to export contacts from your iPhone to Outlook or to import contacts from Outlook to your iPhone you can use this tool:
synchronize iphone contacts with outlook
transfer contacts from iphone to outlook
  • If iTunes is not yet installed on your PC, just download it from the Apple page and follow the setup instructions
  • Connect your iPhone with the PC and make sure that iTunes won't sync automatically with your device. You can block the auto-sync in the iTunes Settings
  • In iTunes, in the left column, under Devices, click on your iPhone, iPod Touch or iPad
  • Go to the Info tab
  • Under contacts, click on "Sync contacts from", and choose Outlook
  • Now you have got the choice between synchronizing all iPhone contacts or just selected groups
  • Once you selected all contacts or some groups, click "Apply"
transfer iphone contacts with outlook
If you want to sync your contacts, mails and calendars it would be better to directly create your Outlook account on your iPhone:
  • On your iPhone go to Settings > Mail, Contacts, Calendars > Add Account and choose Microsoft Exchange
  • Enter your email, user name and password and click "Next"
  • Your iPhone will now contact the Exchange Server and maybe you will need to fill in the address of the server in the "Server field"
  • If you entered all details correctly, you can now choose what kind of information you want to synchronize with your Outlook account. You have got the choice between emails, contacts and calendars
iphone contacts sync
You don't use Outlook, or you don't want to synchronize your iPhone contacts with an Email-Account? In this case you should check out the follwing page, where you can use the free BETA version to manage and transfer iPhone contacts easily.

How to Transfer Contacts for BlackBerry and iPhone

Transfer BlackBerry contacts to iPhone

  1. Run the BlackBerry Desktop Software and connect your BlackBerry to the PC
  2. If you want you can make a full backup of your BlackBerry before transferring your contacts
  3. Once done, switch to the "Organizer" tab, select "Contacts -> Windwos Contacts" and click "Configure"

    transfer contacts from blackberry to iphone
  4. For the Sync direction make sure to select "One way to your computer only" and confirm with "OK"
  5. Back in the main window click "Sync Organizer", check once again the changes that will be made und start the "Sync"
  6. All your contacts have been saved to the Windows Contacts folder
  7. Now start CopyTrans Contacts and connect your iPhone to the PC
  8. Click "Import contacts" and navigate to your contacts folder
  9. Select all contacts and click "Open"
  10. copy contacts from blackberry to iphone
  11. All your contacts have been successfully transferred from the BlackBerry to the iPhone

Transfer iPhone contacts to BlackBerry

  1. Run CopyTrans Contacts and connect your iPhone to the computer
  2. Once the iPhone contents show up, select the contacts that you want to transfer to the BlackBerry and click "Export selected"
  3. Next, select "BlackBerry" and make sure to save your iPhone contacts directly to the Windows Contacts folder (C:\Users\YOUR ACCOUNT\Contacts), as the BlackBerry Desktop Software will only look in this folder for your contacts
  4. copy iphone contacts to blackberry
  5. Now open the BlackBerry Desktop Software and connect your BlackBerry to the PC
  6. Switch to the tab named "Organizer" and check the option "Contacts -> Windows Contacts"
  7. Click "Configure" and set the Sync direction to "One way to your device only"
  8. Confirm with OK and back in the Organizer tab click "Sync Organizer"
  9. Check if the number of contacts that will be added to your BlackBerry corresponds to the number of contacts that you exported from your iPhone and click "Sync"
  10. transfer iphone address book to blackberry
  11. That's it, you successfully transferred your contacts from the iPhone to the BlackBerry handheld

After updating to Windows 8.1 iCloud no longer syncs with Outlook

Solution 1:

  1. Open iCloud Control Panel on your Windows 8.1 PC

    run icloud control center on windows 8.1
  2. Un-check the “Mail, Contacts, Calendars, and Tasks with Outlook” option and apply the changes.

    disable mail, contacts, calendars, and tasks sync in icloud control panel
  3. Now, check back the box next to “Mail, Contacts, Calendars, and Tasks”

    enable mail, contacts, calendars sync in icloud on windows 8
  4. Open Outlook on your PC and see whether the issue is resolved.

Solution 2:

  1. Run iCloud Control Panel on the computer
  2. With the “Mail, Contacts, Calendars, and Tasks” option checked, click “Sign out”

    sign out of icloud control panel
  3. Upon prompt, click “Delete from computer” this will only temporarily delete the contact and calendar entries from your Windows PC but will not affect the data saved in your iCloud account

    do you want to keep a copy of icloud calendars windows 8
  4. Sign back in and select “Sync to Outlook”
  5. Run Outlook on the PC and see whether the iCloud contacts and calendars have been synced

Solution 3 – Manually sync iCloud contacts and calendars to Outlook

If the above solutions fail to resolve the issue, use the following utility to manually sync your iCloud contacts and calendars to Outlook on any Windows 8.1 PC.
  1. Download the tool from the following page. It works in a similar way to the iCloud Control Panel:

    http://www.copytrans.net/copytranscontacts.php
  2. Run the program on your PC and connect your iCloud account by navigating to More > Cloud setup

    connect icloud account on windows 8.1 without control panel
  3. Click iCloud

    add icloud account to copytrans contacts
  4. Enter the iCloud account username and password

    enter icloud username and password on computer
  5. Your iCloud contacts will appear in the main program window. You can see that these are sourced from iCloud by the little cloud icon on the left. Click on “Export selected”

    icloud contacts on windows 8.1
  6. Click “Outlook (direct export to Outlook)”

    transfer icloud contacts and calendars to outlook on windows
  7. Select the Outlook Contacts where to transfer the iCloud contacts and click OK

    choose outlook contacts folder copytrans contacts
  8. The iCloud contacts are now manually synced to Outlook on Windows 8.1 without the need for iCloud Control Panel.

    outlook contacts synced to icloud windows 8.1

Solutions provided by Microsoft and Apple

Let me know in the comments section below if you found more solutions for iCloud Control Panel not syncing on Windows 8.1.

Fix : YouTube Freezing in IE 11

youtube ie11 freezing
I’m going to start off with the YouTube/Flash/IE 11 issues first because I’ve heard that complaint the most from my clients. It seems to happen on Windows 7 and Windows 8/8.1 on the homepage or while watching certain videos. There are basically two options you have to try and fix this problem.
1. Switch to HTML5 Player on YouTube – Not all videos can play using the newer HTML5 player on YouTube, but a lot can. You can default the YouTube player to use HTML5, if possible, by going to the HTML5 signup page:
https://www.youtube.com/html5
Firstly, you’ll have to be using a compatible browser. IE 11 is compatible and you should see a series of green check marks indicating this.
html5 player youtube
At the bottom, you’ll see a Request the HTML5 player button. Go ahead and click that and now that browser will default to the HTML5 player instead of the default one. However, this didn’t fix the problem for everyone and since it’s not possible to play all videos on YouTube using the HTML5 player, you’ll still run into the  freezing and crashing problem. It’s still a good idea to enable this anyway, though.
2. Enable ActiveX Filtering – I won’t go into much detail, but enabling ActiveX Filtering will block certain interactive content and apps from loading in the browser. By default it is disabled, but enabling it does fix the freezing issue on YouTube. You can leave it enabled for other sites, but keep in mind that it could cause a game or video to not load properly. You probably won’t run into that issue, but if you do, you can just disable it again.
To enable ActiveX Filtering, press the ALT key on your keyboard while IE 11 is open and then click on Tools and just click on ActiveX Filtering.
enable activex filtering
If you go back and click on Tools again, you’ll see that it will have a check next to it, which means it is now enabled. Restart the browser and try to visit YouTube again and see if the issue occurs.

Fix General Flash Issues

If you’re having problems with flash on other sites like Facebook or elsewhere, the solutions above may not work or you may not have the option. Also, enable ActiveX Filtering can be annoying since it can block content on other sites. In that case, there are still some steps you can take to resolve the problem.

Revert Flash to Previous Version

If you started having this problem after installing the latest version of Adobe Flash, you might have to revert back to a previous version. Several clients reported installing the latest version of flash and then experiencing the crashes. However, before you revert to a previous version, make sure you have the absolute latest version because Adobe is aware of the issue and will probably release a fix, so if you don’t have the latest latest version, then you should first upgrade to the latest and only revert to a previous version if that doesn’t work either.
You can follow Adobe’s guide to installing an older version of Flash, which walks you through the process step by step. Then you’ll have to visit the Flash Player Archive page and scroll down to the following listing:
flash player archives
Before you do this, you’ll want to check which version of flash you have installed. You can do this by clicking on the gear icon at the top right and clicking on Manage add-ons.
manage addons ie11
Now click on Toolbars and Extensions and you should see Shockwave Flash Object listed. If you don’t see it, you need to open a webpage that has actual flash content. You can visit this page before going to the manage add-ons dialog:
http://helpx.adobe.com/flash-player.html
flash version
You’ll see the flash version in the section at the bottom. Now you can download an older version from the archive page after you uninstall the current version, of course.

Turn Off Enhanced Protected Mode

IE 11 in Windows 7 and Windows 8 comes with a feature called Enhanced Protected Mode enabled by default. In Windows 8.1, it’s actually disabled and that is because it was causing a lot of problems. You can check to make sure it’s disabled by going to the gear icon again, but this time clicking on Internet options.
disable enhance protected mode
Click on the Advanced tab and then scroll down to almost the bottom of the listbox. There you will see an option called Enable Enhanced Protected Mode. Make sure it’s unchecked. Make sure to restart IE 11 and then give the offending sites a try again.

Compatibility View Settings

You can also try to add the site that is causing issues to the compatibility view option in IE 11. This seems to fix the issue for certain users on certain sites. To do this, click on the gear icon and choose Compatibility View settings.
compatibility view settings
Go ahead and type in the name of the website like youtube.com or whatever site is causing IE 11 to crash or freeze. It’s not sure shot solution, but it does help.

Disable Adobe Flash

As a last resort, you can try disabling Adobe Flash. Obviously, the downside here is that you won’t be able to view flash content, but it might be ok on sites that automatically support HTML5 such as YouTube, etc. It also may be the case that you really don’t care about the flash content on a particular site, but just don’t want IE 11 to keep crashing and freezing, in which case disabling flash altogether would be the best option.
To do this, you follow the same instructions above that I had shown for finding the flash version installed on your system (click on the gear icon, click on Manage add-ons).
disable flash windows 8
You’ll see a Disable button at the bottom right. I personally don’t care for flash and have never really needed it, so I just keep it disabled. With flash disabled, you don’t have to worry about IE 11 freezing up anymore either. If you’ve run across another solution or fix for this problem, feel free to post it in the comments. Enjoy!

Easy Create and Share Map Drive or Network Drive in Windows 8

To map a shared folder as a network drive in windows8 operating system, please follow the below steps:-
- Press Windows+R key to open "Computer" where all drives and partitions exists.
- On the top of the windows you can see "Map Drive" Icon as shown in below given screen shot:
- Once you will click on "Map Network Drive", a Pop-up window will appear and will prompt you to give the share path of network location/folder which you want to map a network drive in your computer (screen shot given below).
Please enter the network location path of shared folder and click on finish.
 Now you are done with mapping  network drive for your Windows8 computer. You can see the network mapped drive in your "Computer" along with other local drives.
 

Games

Infolinks.com, 75834 , DIRECT appnexus.com, 3251, RESELLER openx.com, 118151, RESELLER, 6a698e2ec38604c6 openx.com, 540118184, DIRECT, 6a698e2ec38604c6 Pubmatic.com, 60809,RESELLER,5d62403b186f2ace Adtech.com, 11409, RESELLER google.com, pub-6373315980741255, RESELLER, f08c47fec0942fa0 google.com, pub-2697483239283649, RESELLER, f08c47fec0942fa0 aol.com, 6202, RESELLER aol.com, 17744, RESELLER lkqd.net, 295, RESELLER, 59c49fa9598a0117 lkqd.com, 295, RESELLER, 59c49fa9598a0117 Freewheel.tv, 482337, RESELLER Freewheel.tv, 480609, RESELLER revcontent.com, 29124, RESELLER appnexus.com, 7666, RESELLER, f5ab79cb980f11d1 rubiconproject.com, 156042, RESELLER, 0bfd66d529a55807 advertising.com, 8603, RESELLER advertising.com, 3531, RESELLER appnexus.com, 3364, RESELLER Indexexchange.com, 183756, RESELLER openx.com, 539154393, RESELLER rubiconproject.com, 16698, RESELLER, 0bfd66d529a55807 rubiconproject.com, 16904, RESELLER, 0bfd66d529a55807 deepintent.com, 100004190, RESELLER, 4a5487c769369a8c pubmatic.com, 156872, RESELLER, 5d62403b186f2ace taboola.com, 1139936,RESELLER,c228e6794e811952 taboola.com, 1135488,RESELLER,c228e6794e811952 vi.ai, 913453223927387, RESELLER spotxchange.com, 74964, RESELLER, 7842df1d2fe2db34 spotx.tv, 74964, RESELLER, 7842df1d2fe2db34 smartadserver.com, 2776,RESELLER pubmatic.com, 156830, RESELLER rubiconproject.com, 15476, RESELLER, 0bfd66d529a55807 contextweb.com, 559988, RESELLER, 89ff185a4c4e857c